Getting Started for Developers - Windows
Pre-requisites
To get started on Windows, the following components are needed:
Git required to get the code. Optionally, a helper software such as TurtoiseGit or GitHub Desktop could be used.
CMake required to build the python environment and translations. Could also be installed as part of Qt if that optional component is installed
Miniconda 3 required to build the python environment
PostgreSQL for the database backend
NGINX for the system routing
Node.js required for the VideoRehab service
OpenSSL required to generate device certificates and for self-signed certificate generation. The “light” version is sufficient if using the linked website for download.
(Optional) Qt Creator for a UI to execute the
cmakecommand(Optional) PyCharm for a development UI (very recommended, though you could, in theory, use any other IDE or text editor)
Install every pre-requisite, making sure to consider the specific install options below for some of them.
Installing Miniconda
In the install process, please make sure to install Miniconda “Just for me” and into the “home” directory (path should look like: C:\Users\<username>\miniconda3). This is important as the cmakefiles used to generate the environment will look into that folder for Miniconda.
Installing PostgreSQL
The install process is straightforward. The postgresql should be noted as the port if the defaults are not used. Configuration files will need to be adjusted accordingly.
Stack Builder is not required for the simple setup.
The PostgreSQL should be run as a system service, though you could also manually launch it before running the OpenTera main script.
Installing Redis Server
Make sure to install the server as a service or to properly manually launch it before running the OpenTera main script.
If you are setting a user and a password, you will need to adjust the configuration files accordingly.
Installing (and running) NGINX
NGINX for Windows doesn’t provide an installer. Installation should be done manually by extracting the archive in a specific folder (such as C:\nginx). Note that path for further use.
There is no built-in way to run NGINX as a service without using third-party options (such as NSSM). The server will need to be started manually with the following commands:
cd C:\<nginx install folder>
start nginx -c <OpenTera base git folder>\teraserver\python\config\nginx.conf -p C:\<nginx install folder>
If you need to stop the NGINX server:
cd C:\<nginx install folder>
nginx -s quit
Those commands could be put in a batch (.bat) file for easy start/stop procedure.
Installing Qt Creator
While this step is optional, it could ease the environment building process. When installing Qt, only the Qt Creator is needed for this project. You would, however, include CMake from there or a supported Qt environment if you’re planning to also setup a development environment for OpenTeraPlus
Environment setup
1. Get the code!
To get started with this project and develop, clone the project in a working directory.
If you need a stable branch, you should clone the main branch. Otherwise, it is recommended to start and clone the dev branch. If using a command line interface, the following command should be used, replacing the <branch> tag:
git clone --recursive -b <branch> https://github.com/introlab/opentera.git
If using an external tool, ensure to use the --recursive flag to clone the submodules at the same time.
2. Generate the Python environment
CMake is used to generate the python environment. While, in theory, you could create a virtual environment by yourself using the requirements file, it is easier to simply use the cmake tool.
If you are using Qt Creator and that the CMake tool is properly set up, you should simply be able to Run CMake and then Build the project. Make sure that the target python-all is specified as the environment will not be properly generated otherwise.
On a command line interface, the following commands should be used (while in the <base folder>/teraserver directory):
cmake
cmake --build --target python-all
3. Databases setup
While the database structure by itself will be auto-generated the first time OpenTera is run, the databases will need to have been created beforehand.
Open the pgAdmin interface.
Login to the database manager using the password specified at the installation

On the left side, expand the “Servers” section. If required, enter the password again.
The pgAdmin interface will then be ready for the next steps.
Creating users
A single user, teraagent with the default password tera will need to be created before creating the required databases. A different user and/or a different password could be used, but the configuration files will need to be adjusted accordingly.
Right-click on the
Login/Group Rolessection in the left tree of the pgAdmin interfaceSelect
Create...and thenLogin/Group Role...Fill the following informations in the dialog:
General-Name: teraagentDefinition-Password: teraPrivileges-Can login: On
Save the dialog
The teraagent user should have been created.
Creating databases
Each system service will requires its own database. The default database that needs to be created are as follow:
opentera, the main OpenTera service databaseopenterafiles, the database for the file transfer serviceopenteralogs, the database for the logging serviceopenteraemails, the database for the email service
The steps to create a database are as follow. Those steps should be repeated for each database to create.
In pgAdmin, under
Servers, right-click on the correct server instance (for examplePostgreSQL 13).Select
Create...and `Database…”Fill the following informations in the dialog: *
General-Database: name of the database to create (see above) *General-Owner: teraagentSave the dialog
4. Videorehab service setup
That service requires a node.js environment to be set up.
In a command line console,
cd <base folder>/teraserver/easyrtcRun the
npm installcommand
The node.js environment should then be properly installed.
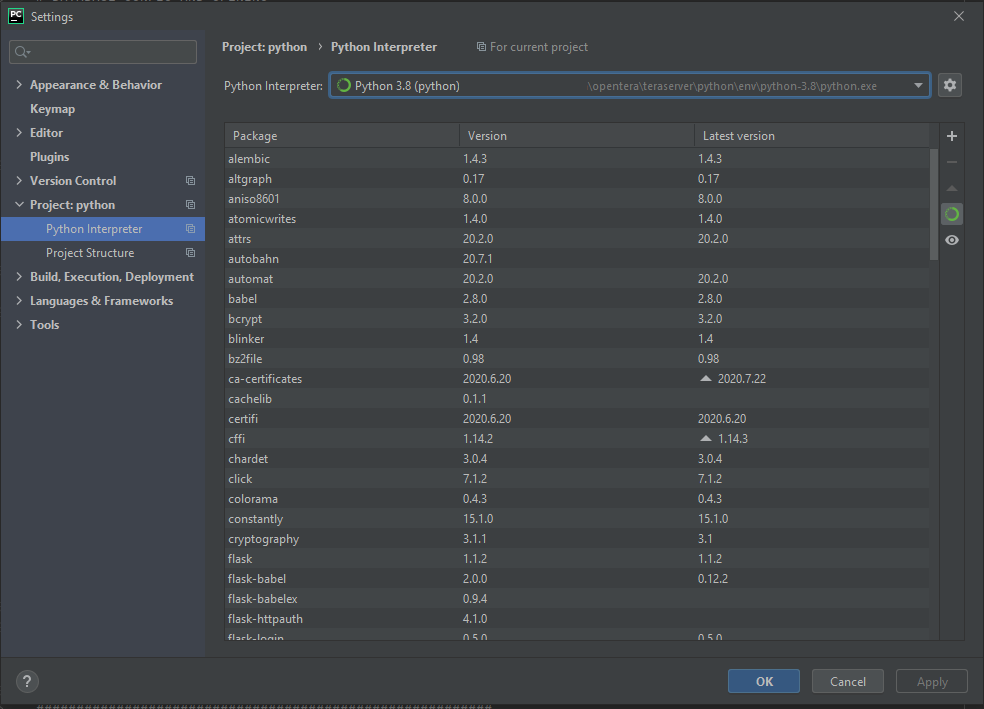
5. PyCharm setup (if required)
If using PyCharm, the correct Python interpreter and environment will need to be set up before being able to properly run the server.
Open PyCharm, loading the project from
<base folder>/teraserver/pythonIn
Files -> Settings-> Project : python -> Python Interpreter, click on theShow alloption in the selection bar.In the
Virtualenvtab, choose the existing environment. Change the interpreter to the following :...\teraserver\python\env\python-3.##\python.exe, where##is the current python version of the project. The end result should look like this :
6. Self-signed certificates generation Self-signed certificates should be generated for the development server and to sign device certificates.
This can simply be done by running the CreateCertificates.py script (directly in PyCharm if configured)
Starting the main OpenTera service
If all the configuration was properly done, you should now be able to run the main script, TeraServer.py.
Don’t forget to start the NGINX router beforehand and any other component that were not set to auto-run or as a Windows service.
If all went well, you should be able to see the About page in your browser: https://127.0.0.1:40075/about